If you want to create a personalised signature for your email messages in Outlook 2016. This blog is for you and we will teach you how to include text, images and even images of your handwritten signature. After the setup, the signatures will be automatically included in all outgoing messages or you can choose which messages include a email signature.
Step 1:
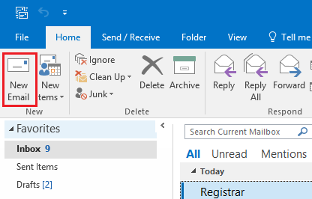
Open a new email
Step 2:
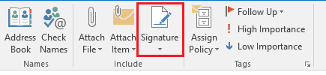
Click “Signature” button.
Step 3:
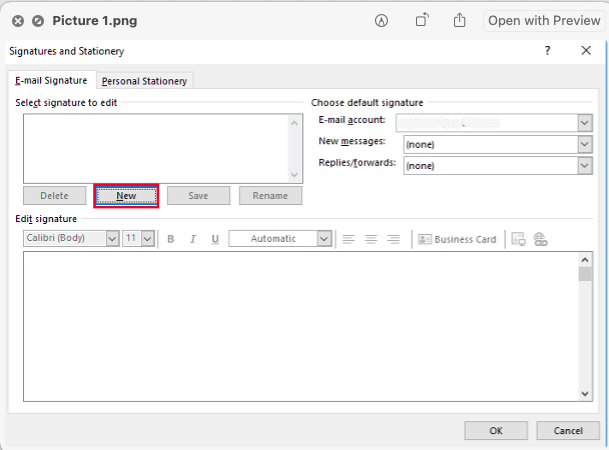
Under “Select signature to edit” click “New” option. And then type a name for the signature. For demonstration, I used “first signature” as an example.
Step 4:
Under “Edit signature, type the signature.
Step 5:
Under “Choose default signature”, there are 3 options:
- E-mail account: choose an email account to associate with this signature.
- New messages: choose the signature that you want Outlook will add automatically to all new email messages. In this case you can choose “first signature” if you want to apply “first signature” in all messages. Otherwise, choose “(none)”.
- Replies/forwards: choose the signature that you want Outlook add automatically when you reply to or forward messages. Otherwise, accept the default option of (none).
You can change the font and colour according to your preference under the “Edit signature” section. You can also add a logo or image to your signature by selecting the image icon, and then select “Insert” option
Finally, when you are done, choose “OK” to save your new signature and return to your message. Outlook doesn’t add your new signature to the message you just created in Step 1, even if you chose to apply the signature to all new messages. You will have to add the signature manually to this message. But the message you will create in the future will include your personalised signature.